

Improve security, simplify login, and give your users a better Salesforce experience.
As organizations adopt more cloud applications, managing usernames and passwords across multiple systems becomes increasingly difficult. One of the simplest ways to improve both security and user experience is by implementing Single Sign-On (SSO).
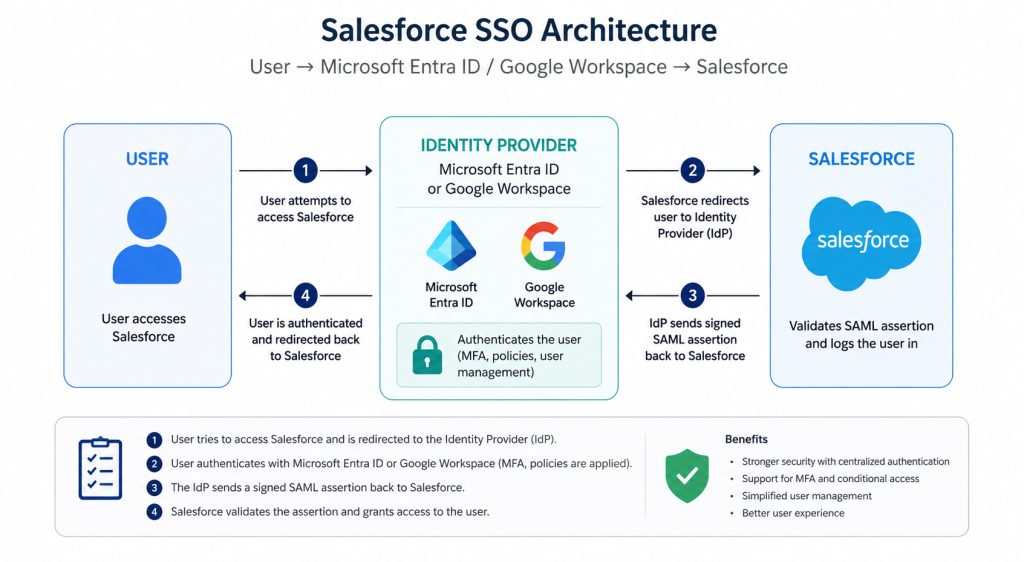
With SSO, users authenticate once through your organization’s identity provider—such as Microsoft Entra ID (formerly Azure Active Directory) or Google Workspace—and gain seamless access to Salesforce without maintaining a separate Salesforce password.
This guide explains what SSO is, why it matters, and the general steps required to configure Salesforce with either Microsoft or Google.
Why Implement SSO?
Organizations choose SSO for several reasons:
- Better security by centralizing authentication
- Improved user experience with fewer passwords
- Simplified user onboarding and offboarding
- Support for Multi-Factor Authentication (MFA)
- Centralized identity management
- Reduced password reset requests
For many organizations, SSO is one of the highest-value security improvements they can make in Salesforce.
Before You Begin
Before configuring SSO, make sure you have:
- A Salesforce organization with System Administrator access
- Administrative access to Microsoft Entra ID or Google Workspace
- A verified Salesforce My Domain
- SSL enabled (standard with Salesforce)
- A test user account for validation
- A rollback plan in case authentication issues occur
Best Practice: Always configure and test SSO in a Salesforce Sandbox before enabling it in Production.
Understanding the Authentication Flow
Regardless of which identity provider you choose, the process is essentially the same:
- User browses to Salesforce.
- Salesforce redirects the user to the Identity Provider (IdP).
- The user authenticates with Microsoft or Google.
- The Identity Provider sends a signed SAML assertion back to Salesforce.
- Salesforce validates the assertion and logs the user in.
Salesforce acts as the Service Provider (SP), while Microsoft Entra ID or Google Workspace acts as the Identity Provider (IdP).
Step 1: Configure My Domain in Salesforce
Before enabling SSO:
- Navigate to Setup → My Domain
- Create your organization’s domain if one doesn’t already exist.
- Deploy the My Domain.
- Verify users can access Salesforce through the new URL.
My Domain is required for modern authentication and SSO.
Step 2: Configure Salesforce as a Service Provider
In Salesforce:
- Navigate to Setup → Identity → Single Sign-On Settings
- Enable SAML.
- Create a new SAML configuration.
- Enter:
- Identity Provider Login URL
- Identity Provider Certificate
- Entity ID
- ACS (Assertion Consumer Service) URL
- Save the configuration.
Most of these values come directly from Microsoft Entra ID or Google Workspace during their SAML application setup.
Option 1: Configure Microsoft Entra ID
Create the Enterprise Application
In Microsoft Entra Admin Center:
- Navigate to Enterprise Applications
- Select New Application
- Choose Salesforce
- Create the application.
Configure SAML Authentication
Within the Enterprise Application:
- Enable SAML-based Single Sign-On
- Configure:
- Identifier (Entity ID)
- Reply URL (ACS URL)
- Sign-On URL
- Download the signing certificate.
- Copy the Login URL.
These values are entered into Salesforce.
Configure User Attributes
Typical mappings include:
| Microsoft Attribute | Salesforce Field |
|---|---|
| User Principal Name | Federation ID or Username |
| First Name | FirstName |
| Last Name | LastName |
Assign Users
Assign the Enterprise Application to:
- Individual users
- Security groups
- Dynamic groups
Only assigned users will be able to authenticate.
Option 2: Configure Google Workspace
In the Google Admin Console:
- Navigate to Apps → Web and Mobile Apps
- Add a Custom SAML Application
- Name the application “Salesforce.”
Configure SAML
Google will provide:
- SSO URL
- Entity ID
- X.509 Certificate
Enter these values into Salesforce’s SAML configuration.
Attribute Mapping
Typical mappings include:
| Google Attribute | Salesforce Field |
|---|---|
| Primary Email | Username or Federation ID |
| First Name | FirstName |
| Last Name | LastName |
Assign the Application
Choose:
- Everyone
- Organizational Units
- Groups
Begin with a small pilot group before expanding to all users.
Step 3: Configure Federation IDs (Optional but Recommended)
Although Salesforce usernames can be used for SSO, many organizations prefer Federation IDs.
Benefits include:
- Usernames can change
- Easier migrations
- Cleaner integrations
- Better identity governance
Populate each Salesforce user’s Federation ID with the matching Microsoft or Google identity.
Step 4: Test with a Pilot Group
Never enable SSO for every user immediately.
Instead:
- Select 5–10 pilot users.
- Test:
- Login success
- Logout
- MFA
- Mobile app access
- Experience Cloud (if applicable)
Verify that all expected user scenarios work correctly before broader deployment.
Step 5: Roll Out to Production
Once testing is complete:
- Expand assignments to additional users.
- Communicate the new login experience.
- Provide quick-reference instructions.
- Monitor login history and authentication errors during rollout.
Keep a Salesforce administrator account with standard login available until you’re confident the deployment is stable.
Common Pitfalls
Avoid these common mistakes:
- Forgetting to configure My Domain
- Incorrect Entity ID or ACS URL
- Missing or expired signing certificates
- Mismatched usernames
- Federation IDs that don’t match the identity provider
- Not testing in a Sandbox
- Locking out administrators by enabling SSO too early
A phased rollout significantly reduces deployment risk.
Security Best Practices
For the best security posture:
- Enable Multi-Factor Authentication through your Identity Provider.
- Use Conditional Access (Microsoft) or Context-Aware Access (Google) where appropriate.
- Use least-privilege administrative access.
- Rotate certificates before expiration.
- Audit login history regularly.
- Review inactive users and application assignments on a recurring basis.
Final Thoughts
Single Sign-On is more than a convenience feature—it’s a foundational component of a modern Salesforce security strategy.
Whether your organization uses Microsoft Entra ID or Google Workspace, implementing SSO can improve security, simplify user management, and create a better login experience for your employees.
The most successful implementations begin with careful planning, thorough testing in a Sandbox, and a phased rollout to production. With the right approach, your organization can reduce administrative overhead while providing users with secure, seamless access to Salesforce.
Need Help Implementing Salesforce SSO?
If you’re planning to implement Salesforce SSO or modernize your identity and access strategy, RXN Technologies can help. We assist organizations with Salesforce security architecture, identity integration, permission strategy, and deployment best practices—helping you deliver secure, scalable solutions without unnecessary complexity.
Schedule a free consultation to discuss your Salesforce security roadmap.